
How to Create a Chat System in Unity with Mirror
Posted on Jul 10, 2020
How I created a chat system in Unity in under 30 minutes with Mirror Networking.
Introduction
One of my Unity projects utilizes UNet which is a low level multiplayer API which is now deprecated. I needed a good networking solution that supports basic server-client communication and data transport. In search for a replacement, I quickly found Mirror.
One way I experimented with Mirror to make sure it fits my application’s needs was to create a chat system. I found several helpful tutorials online for setting up a chat box and network manager. Here I will aggregate those tutorials and show a comprehensive source for creating a chat system in Unity. This tutorial assumes that you have already installed Unity (preferably updated to the latest version or 2018.4 LTS and higher for compatibility with Mirror).
![]()
Installations
The first step is to install Mirror. It is a Unity Package so installation is very simple. Go to the Mirror page on Unity asset store (create a Unity account if you haven’t) and click on “Add to My Assets”. Follow the installation process to open with Unity, download the package, and install into your app. In order for the Mirror GameObjects to show up, restart Unity.
Setting up Network Manager
Once you have restarted Unity, create an Empty GameObject and name it “NetworkManager”. This will contain Mirror components needed to establish our server and player connections. To NetworkManager, add a NetworkManager component (which will also add Telepathy Transport) and a NetworkManagerHUD. Leave all fields as their presets for now.
Setting up the Chat Box
If you are developing a game, the client could be an object or character in your game. When players join the game, they are represented as that object or character. Since we are creating a standalone chat, any of the default shapes should work. I chose a cube, but feel free to pick one of the other standard 2D or 3D shapes. Add a Cube object to the scene.
A standard chat box displays the most recent text at the bottom and pushes old text upwards as new messages come in. On a laptop or desktop, users can typically send a message via hitting the Enter or Return button on their device. Finally, with a large volume of text, users can scroll up to view previous messages. We will simulate all of the functionalities above.
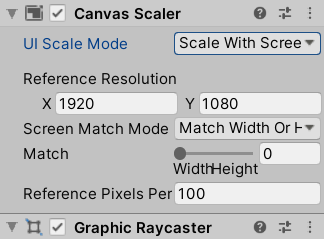
Add a Canvas object as a child of the Cube object. This Canvas will hold all of the UI features we need for a functional chat box. In the Inspector, set UI Scale Mode under Canvas Scaler to Scale with Screen Size and change the Reference Resolution to your screen’s resolution:
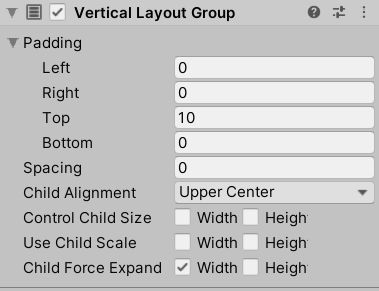
Next, add a Panel object as a child of the Canvas object you just added. In the Inspector, add a Vertical Layout Group to the Panel. Uncheck Height in Child Force Expand and change Child Alignment to Upper Center:
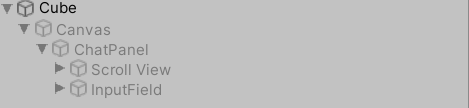
To the Panel object, add a Scroll View object and a InputField object as children. We end up with this Hierarchy:
Infinite Scrolling and Bottom-up Text Display
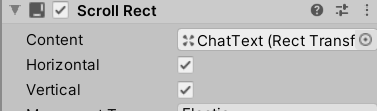
In order to achieve the standard chat box look, we are going to modify our Scroll View. Under Scroll View → Viewport, delete Content. Instead of using the default Content child, we are replacing it with a Text object. Add a Text object as a Child of Viewport. Click on Scroll View and in the Inspector, drag and drop the Text object on to Content under Scroll Rect (I named my Text object ChatText):
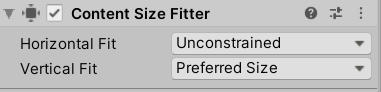
The Text object we added will contain all of the messages sent in the app. Therefore, we need it to expand as new messages are added. To accomplish this, add a Content Size Fitter component to Text. Set Vertical Fit to Preferred Size:
Under Rect Transform, set the Text’s Pivot to X = 0.5 and Y = 0.01. You might have to scale the Text so that it takes up the appropriate amount of space on the Scroll View. Delete the preset text in the Text object if needed and set the text color to your liking. You should end up with something that look like this:

Network Scripting
This portion of the tutorial is borrowed from a tutorial by Dapper Dino on Youtube. We are going to add a simple script to allow the client to send messages and display those messages on the server. If the server is registered as both a server and client, then it will also be able to send messages. We will get back to this shortly.
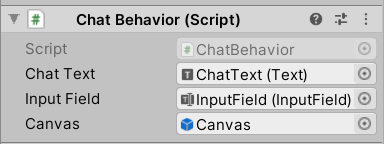
First, add a script to your project (right click in Project and go to Create → C# Script). Name the script something relevant, such as ChatBehavior. Double click on the new script. This should lead to your default editor for Unity (mine is Visual Studio). If you have never opened a C# script from Unity before, you may be prompted to pick your editor. Visual Studio or Visual Studio Code work best because they both have plugins that you can install to communicate with Unity and update the scene according to your script changes almost in real-time.
The script should look like the following (make sure to modify the class name based on your script’s name).
The script is relatively straight forward. There are three variables, one for the Text that displays all of the messages, one for the InputField that client types new messages in, and one for the Canvas itself. The Canvas is only set visible for a client when they are connected to the server. When the client hits the Enter or Return button on their keyboard, as long as the InputField is not empty, the message it contains gets sent to everyone on the server.
Putting Everything Together
Once we have the script, we can now proceed to connecting it with the UI elements. Click on the Cube object in Hierarchy and add a NetworkIdentity component to it. Leave the settings as default. Then drag and drop the new script we added on to the Cube. Add the appropriate variables to each of the private variables in the script:
Click on Canvas and uncheck the checkbox to the left of its name. This will hide the Canvas until the method OnStartAuthority() is called:

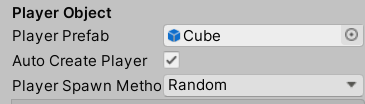
Drag the Cube object into the Unity Project panel (preferably in a prefab folder) so it can be used as a player prefab for our Network Manager. Go to the Network Manager component under NetworkManager. Drag and drop the Cube prefab from the Project panel into the Player Prefab slot under Player Object.
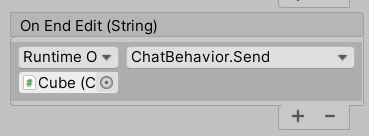
Delete the Cube object in the Hierarchy as we no longer need it. Our Cube will be spawned per client on connection. The last thing we need to do is to go to InputField under Cube → Canvas → ChatPanel (double click on the Cube prefab to see Cube in Hierarchy) and add an event listener. This event listener will enable us to call Send() when we press Enter or Return on our keyboard. Under Input Field → On End Edit, drag the Cube prefab to the None (Object) slot and make sure that Runtime Only is selected right above it. Click on No Function drop-down menu and select ChatBehavior → Send().
Running the App
In order to run the app, you need to have two different windows, one serve as a server and the other a client. We will use a built version and our Unity window as the two actors. Click on File → Build Settings… and select the scene that you want to build (or click on Add Open Scenes). Select Build and Run at the bottom right corner of the Build Settings window. Once the app built, you should see it running with the following buttons:
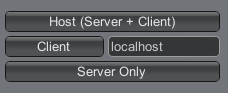
Mirror gives you the default options to run as a Server + Client, Client only, or Server Only. Since we want to be able to use this window with a chat, we will choose Host (Server + Client). You should then see the chat box pop up. Go to Unity and click on Play. The same start screen will show, only this time we need to choose client. Once the client joins, you can send messages on both sides! Make sure that you start the server on at least one window before you join as a client.
Conclusion
Server client communication is a useful feature in many applications and can be easily achieved through Unity. The product of this tutorial can be extended in many ways. Some suggestions are:
- UI improvements, such as color-coding messages or indenting them based on the sender, adding a Send button, etc.
- Data processing, such as taking out profanity or auto-correcting commonly misspelled words.
- Adding channels or rooms and having more than one client interact with the channels.
Visit my Medium article on the same tutorial here if you have any suggestions or comments!